Thank you for your purchase of the HeliosPRO Laser DAC. The HeliosPRO Laser DAC is a network ILDA interface/adapter, used for connecting laser show projectors to your computer. It is compatible with every laser projector with a standard ILDA port, and connects to any computer using either Ethernet, USB or WiFi.
Getting Started
In the box you will find the HeliosPRO Laser DAC, a power supply, USB cable, and Ethernet cable.
Using the USB cable and power supply, connect power to the port labeled PWR/CONN. Alternatively, you can connect the USB cable directly from this port to a computer. The device should now power up. While the device is powering up, the LED indicator with a power symbol will start blinking. When the power LED has stopped blinking and is lit constantly, the device has finished powering up and is ready to use. This normally takes around 20 seconds, but it can take longer under certain conditions, such as when network settings have just been changed.
There are two ways to connect the HeliosPRO to your computer:
- Plug the Ethernet cable from the port labeled NET, either directly into the Ethernet port of your computer, or into a router/switch connected to the rest of your network. On most networks, the device should work by default, and you will now be able to connect to it.
NB: If there is no DHCP server (such as a router) on the network, it can take an additional minute for the device to automatically assign an IP address to itself and become discoverable. If your network requires manual configuration, such as a static IP address, see the chapter Management below. - If you used the USB-C cable to power the HeliosPRO directly from the USB port of a computer, you can also connect to the device using this USB connection. No other cables or setup is required.
The DAC should now be detectable in compatible software (see list below), which will be able to control the DAC in real-time. Refer to your software’s manual for instructions on how to detect and enable output to DACs.
When output is active, the LED indicator with a laser symbol will be turned on. The color of this indicator corresponds to the source of the output: Green means that the DAC is controlled by PC software using a network connection, red means that the DAC is controlled by PC software using a USB connection, and orange means that an .ILD file is being played by the device itself, either by the offline file player or by the DMX controller.
When using lasers, it is important to practice safety and familiarize yourself with local laws and regulations.
Using the HeliosPRO as a hub for multiple outputs
It is possible to connect an additional Helios DAC to the USB-A AUX port of the HeliosPRO. This will enable compatible software to detect and use dual outputs from a single network connection, reducing cost and cabling. This feature is only available if the HeliosPRO is connected via network (IDN).
Compatible Software
HeliosPRO is compatible with a wide range of software, including free and cross-platform options.
The adapter uses the IDN protocol for communicating with software over the network.
The HeliosPRO is also backwards compatible with the classic Helios, supporting the same software when using USB.
- LaserShowGen (Windows, Mac, Linux, freemium)
- MadMapper / MadLaser (Windows, Mac)
- Derivative TouchDesigner (Windows, Mac, freemium)
- Spaghetti Laser Show (Windows)
- Millumin (Mac)
- ILD Render (Windows)
- LFI Player (Windows, free and open source)
- HE-Laserscan (Windows, freemium)
- The following software also supports the HeliosPRO, but only using an USB connection, not network:
- Liberation (Mac, Windows) *Get the first month of Liberation free by using coupon code HELIOSFIRSTMONTH
- openFrameworks, via ofxLaser or ofxHelios (Mac, Linux, Windows*, free and open source)
- Pure Data, via pd_helios (Mac, Linux*, Windows*, free and open source)
- Lasercam (Windows)
- Modulaser (Windows, Mac)
- Lasershow Xpress (LSX) (Windows)
- vvvv, via HeliosLaserDac node (Windows, freemium)
- OsciStudio (Windows, Mac)
- NEW: LaserFromSound VST (Windows, Mac)
- Maxwell (Windows, Mac)
- Laser Juice (Mac, Windows, freemium)
- osc2laser (Mac, Windows*, Linux*, free and open source)
- BeamCommander (Mac, free and open source)
Offline File Player
The HeliosPRO is capable of playing .ILD files without needing a connection to a computer.
Uploading files
The files must either be uploaded to the onboard storage of the HeliosPRO, or be placed on a USB storage drive inserted into the AUX port.
If you wish to use the onboard storage (recommended), you must use the HeliosPRO Manager Tool software to upload files. See the chapter “Management” below, specifically the subchapter “File Manager”, for instructions on how to use the Manager Tool to upload files to the onboard storage. There is around 7 GB of available onboard storage space on the HeliosPRO.
If you wish to use a USB storage drive, simply put the .ILD files in the root folder of the storage drive, then insert the drive into the USB-A port of the HeliosPRO (labeled AUX). The storage drive must be present when the HeliosPRO powers up, so if the HeliosPRO is already running, restart it after plugging the USB drive in.
The HeliosPRO is compatible with standard .ILD files in format 0, 1, 4 and 5. NB: It is not yet possible to change the color palette of formats 0 and 1 .ILD files. If the colors appear incorrect, use a third party tool to modify the palette of the files, or wait for a HeliosPRO software updates that adds support for custom palettes.
Files are organized into “programs“, which are essentially mini-playlists that can consist of multiple .ILD files each. Program settings are stored in .PRG files, which can optionally be uploaded/placed together with .ILD files. The HeliosPRO is compatible with most .PRG formats from other manufacturers, but not necessarily the other way around. If an .ILD file is located in the device without an accompanying .PRG file, a program consisting of only that .ILD file is automatically generated with default playback parameters. In the File Manager tab of the HeliosPRO Manager Tool you can change these parameters, for example setting how fast the file should play.
Playing files
Playback can be started manually by pressing the OK button twice. Alternatively, you can set up the device to start playing a program automatically on startup with the “Autoplay” setting. NB: For large files, it can take a moment for the file to load before it starts playing.
Playback can be stopped by holding down the OK button for half a second before releasing it, an action called the ESC button.
The settings for the file player can be changed in the HeliosPRO Manager Tool software. See the chapter “Management” below, specifically the subchapter “File Player settings”. In these settings, you can specify which program to start playing first, and you can also set whether the program should loop, stop playing after one time, or play through each program in storage either alphabetically or in a random shuffle.
If you press the OK button while playback has already started, the file player will “pause” the playlist and loop the same program regardless of the current settings. Pressing OK again will return to the normal playback mode.
Clicking the UP or DOWN buttons while a program is playing will skip to the next or previous program in storage.
Management
Manager Tool Software
To modify various settings, connect to a Wi-Fi network, perform a software update, manage ILD files on your device, and more, you can use the HeliosPRO Manager Tool software. The tool can be downloaded here:
The manager tool consists of a sidebar to the left where you can scan for and select HeliosPRO devices on the network.
In the main section on the right side, there are multiple tabs in a menu at the top for performing different management tasks on the selected device. The Settings tab lets you modify the settings of a device, either online or offline. The File Manager tab lets you browse, upload and change playback parameters of .ILD files on the device. These files can be played by the onboard file player. The Software Update tab lets you upgrade to a newer version of the software on the device, as well as the Manager Tool itself. It is recommended to check for new versions regularly for new features and bug fixes. The Advanced tab contains more technical operations that most users will never require.
Each tab and management task is described in more detail in its own chapter below.
Most elements in the Manager Tool window have tooltips that appear if you hover the mouse over them, explaining their purpose. For more detailed information, you can also click the “Help” button in the bottom left corner to bring up this manual.
Changing and saving settings
There are two methods of changing the configuration of the HeliosPRO device using the HeliosPRO Manager Tool. An online method, if the device currently has a network connection to your computer, or an offline method, if the device is not reachable on the network.
– Online method
When first opening the Manager Tool, click the “Scan available servers” button in the left sidebar. If your DAC is detectable on the network, it will appear in the device list below the button. Click it to select it. The name and available outputs will appear in the top left corner of the window. Normally, you will only have one output per device; however, if you have connected a secondary Helios DAC to the AUX USB port, this will be listed as an additional available output.
You can now change any settings you wish in the main section of the window. The current configuration of the device will be automatically loaded when the device is selected from the device list, but if you wish to restore the default (factory) settings of the device, you can click the “Load default config” button.
Once you have finished setting the desired configuration, you must save the new settings to the device in order for them to take effect. You can do this by clicking the “Save/upload config” button at the bottom. The device may have to be restarted for all settings to take effect. You will be prompted on whether you wish to do this or not. If you choose not to, you can restart the device later by clicking the “Restart device” button.
– Offline method
If your device is not on the network, it is still possible to change its settings offline by using a USB flash drive. Once you have finished setting the desired configuration, click the “Export config to file” button. This will create a settings.ini file, which you must save directly to a USB flash drive. Insert the USB drive into the USB-A port (marked AUX on the HeliosPRO device), then plug the power cable out and back in and wait for the device to restart. When it has finished restarting, the device settings will have been replaced by the configuration in the settings.ini file you exported.
Description of settings
Network settings
The device has two networks that you can configure: Ethernet (wired) and WiFi (wireless). By default, only Ethernet is enabled, with an automatic IP assignment. Automatic assignment means that it waits for a DHCP server (such as a router) to assign it an IP address. If this fails to happen within 1 minute, the device will assign itself a “link-local” type IP address. The result will work in most types of networks.
WiFi can be enabled by checking the “Enable WiFi” checkbox. You must also set the WiFi name and password. You can scan for available WiFi networks with the “Scan nearby WiFi networks” button to the right. Clicking on a scanned WiFi network will select that as your WiFi name.
NB: It is highly recommended to use Ethernet (wired) networking instead of WiFi, as WiFi can be unstable in many conditions and lead to issues such as dropped frames and stuttering.
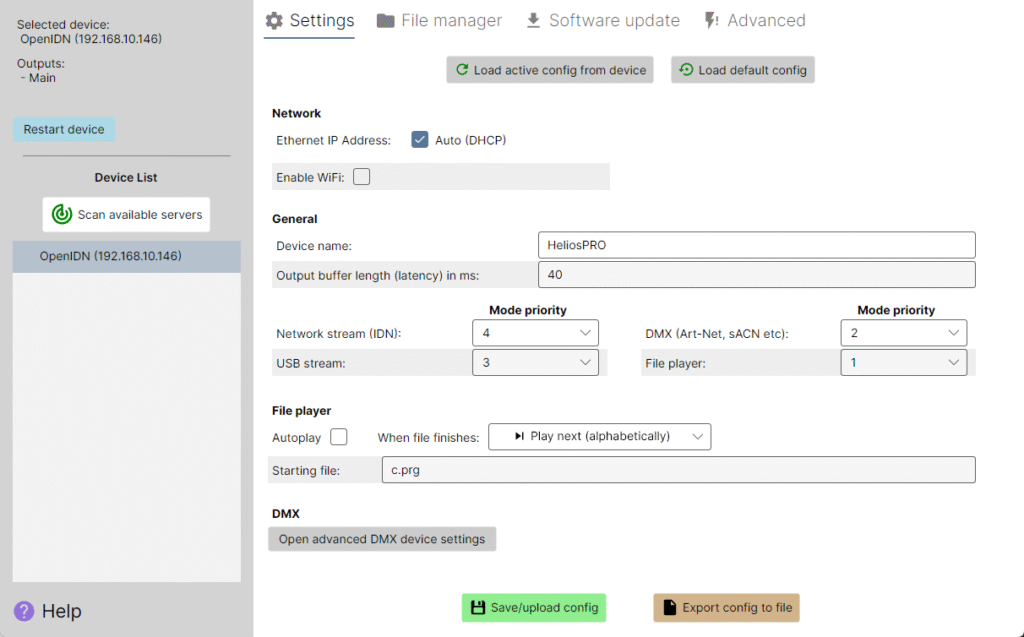
If you need to assign the device a custom static IP address on either Ethernet or WiFi, you can uncheck the “Auto (DHCP)” checkbox and specify the IP address yourself.
If you need to set a custom subnet for the IP address, you can use CIDR notation. For example, 192.168.0.100/16 would mean an IP address of 192.168.0.100 with a subnet mask of 255.255.0.0. If not specified, the subnet suffix will be 24 (255.255.255.0).
If you need to add an additional IP address to the same network port, you can specify multiple IP addresses in CIDR notation by separating them with a comma and a space. For example, 192.168.0.100/16, 10.0.0.174/8 would, in addition to the example address mentioned above, also add the IP address 10.0.0.174 (subnet 255.0.0.0) which is a part of the official IP address range for ArtNet, which may be required to make the HeliosPRO function with other ArtNet equipment.
General settings
“Device name” is the name that the DAC will appear as in software. It is set to a unique identifier by default, but you can set a custom name here if you prefer.
“Output buffer length (latency)” is the target buffering latency when streaming laser graphics to the device. A lower latency means more responsive output, but can cause instability and issues like stuttering. Conversely, in noisy network conditions or when using WiFi it can be advisable to increase this value for a more stable stream.
“Mode priority” determines which output source takes priority in the case that multiple sources are active at the same time. There are four sources of laser output: Network streams from software, USB streams from software, DMX commands and the offline .ILD file player. By default the priority is the same as this order, e.g if an .ILD file is being played by the offline file player, but then the DAC receives a stream of data over the network, the output will switch to the network stream because it has higher priority. But this priority order can be modified with these settings.
It is also possible to entirely disable output from certain sources by choosing “Disable” in the dropdown menus.
File Player settings
The HeliosPRO features a built-in file player that can play .ILD files without having to be connected to a host computer. You can find more information on this functionality in the File Player mode chapter, but these settings are available in the Manager Tool:
“Autoplay” determines whether the device will automatically start playing files when it is powered up. For this to function, there must be at least one valid .ILD file on the device. If there is more than one file on the device, the “Starting file” field determines which file will start playing first. Before setting the “starting file”, it is recommended to go to the “File Manager” tab and refresh the file list. This enables auto-completion on the starting file field to make it easier to select a valid file.
NB: The autoplay functionality can cause the laser to turn on unexpectedly if the user is not prepared. Only enable this feature if the laser is mounted in a way that makes it impossible for any persons to be located in the path of the laser.
The “When file finishes:” setting determines how to proceed after a file has been played through. You can choose to stop (only play the file once), repeat the same file, or play the next file on the device in either a random or alphabetical order.
DMX settings
The network DMX (ArtNet, sACN, etc.) functionality is not yet finished on the HeliosPRO and the settings have no function. This feature will be enabled in a future software update.
File Manager
The file manager tab of the HeliosPRO Manager Tool lets you browse, upload and change playback parameters of .ILD files on the device. These files can be played by the onboard file player. You can find more information on this functionality in the File Player mode chapter.
When a device has been selected from the device list in the left sidebar, you can click the “Refresh file list” button to refresh the list of playable files found on the device. If there are no files on the device, you can upload your own files using the “Upload .ILD files” button. NB: After you have uploaded files, you may have to restart the device to have them be recognized by the software and listed in the file list.
Files are organized into “programs”, which are essentially mini-playlists that can consist of multiple .ILD files each. Program settings are stored in .PRG files, which can optionally be uploaded together with .ILD files. If an .ILD file is located in the device without an accompanying .PRG file, a program consisting of only that .ILD file is automatically generated.
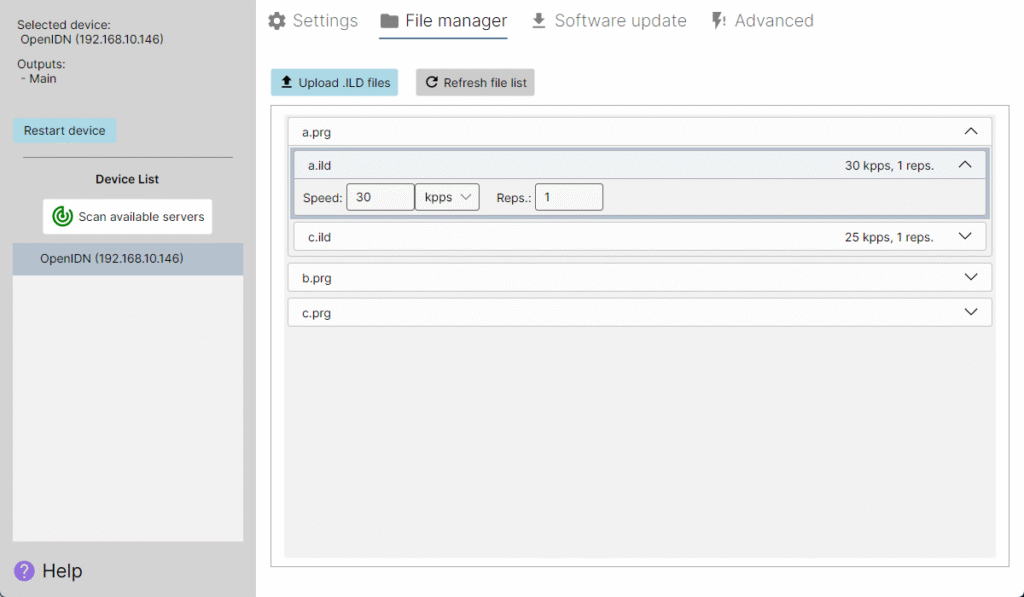
Once you have uploaded files and they appear in the file list, the files can be played by the device. However, you may want to change the speed at which the files play. This can be done by clicking on a program in the file list, and then on an .ILD file inside the program. The playback speed (Speed) can be set in either thousands of points per second (kpps) or frames per second (fps). If you want an animation to play relatively slowly, but this causes too much flickering, you can increase the number of repetitions (Reps.) instead of the playback speed. This will cause each frame to be repeated the desired number of times, slowing down the animation speed without slowing down the actual scan rate. Once playback parameters have been changed, click the “Save changes” button that will appear above the file.
Software Update
The software update tab of the HeliosPRO Manager Tool lets you check the current version of both the device software (firmware), and the Manager Tool itself, and compare with the newest available versions.
If there is a new version available, red-colored text will inform you and prompt you to update.
It is highly recommended to check for new versions regularly, as they can contain new features and bug fixes. To see a full archive of releases and the changelog, see the GitHub release page.
To update the device software of the selected HeliosPRO, first download the latest version of the software by clicking the “Download latest device software” button (step 1). Then, you can click the “Install new device software” button (step 2).
If you wish to install a custom software version instead of the latest official version, you can do so by instead clicking the “Manually select device software” button during step 1, and then proceeding to step 2 as before.
NB: Regular users should typically not have to do this.
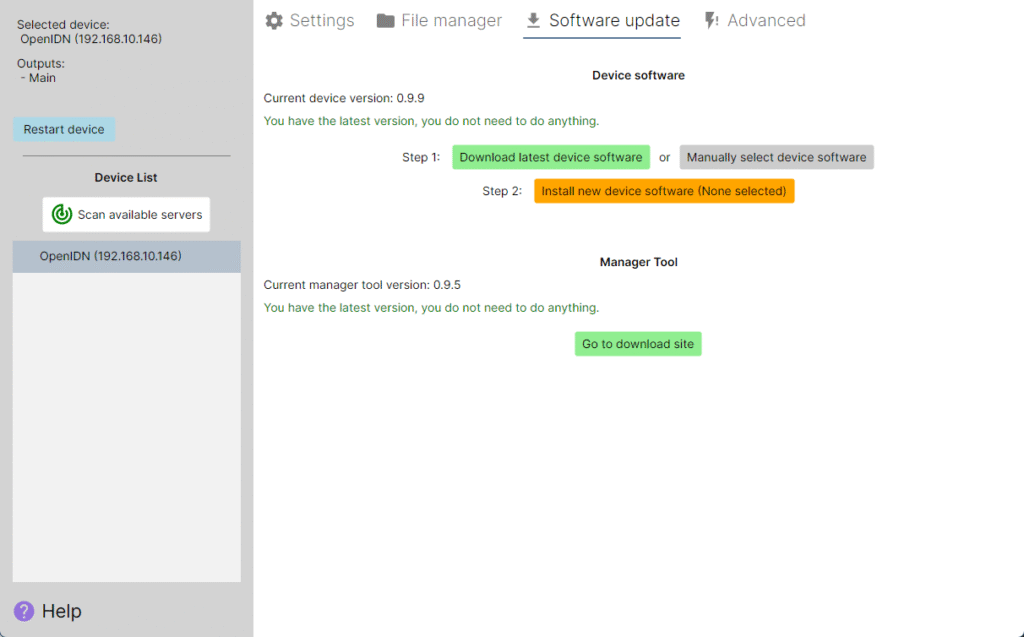
If the Manager Tool itself is outdated, you can go to the download page by clicking the “Go to download site” button. From there, you must download and install the new Manager Tool yourself, there is no automatic update functionality.
Support
If you experience any issues with the device not covered in this manual, please contact us at gitle@bitlasers.com.
The HeliosPRO is covered by a two-year warranty against defects.
Electronics such as the HeliosPRO should be disposed of through an e-waste recycling center.
When using lasers, it is important to practice safety and familiarize yourself with local regulations.
The HeliosPRO is designed and distributed by:
Mikkelsen Innovasjon (ENK), VAT ID: NO 923 589 155 MVA
Hamrehaugen 62, 5161 Laksevåg, Norway
Contact: www.bitlasers.com/about
Developers
Third-party software integration
The Helios GitHub repo contains libraries for integrating Helios support in your software. Navigate to the folder “sdk” to find the relevant code. You can choose to use a dynamic library with the exported C-style functions documented in HeliosDacAPI.h, which can be called from a number of programming languages, or you can use the
HeliosDac.h class directly if you work in C++. There are examples in C++ and Python. The Helios DAC libraries are compatible with most operating systems, including Windows, Linux, Mac, Android, and more.
The driver depends on libusb. You can use the included binaries, or you can build your own. You can find the libusb source for that on their website, linked earlier in this paragraph.
Please do not hesitate to contact us if you have any questions or problems. We would love to help you implement support for the Helios product line in your software.